Wafid Medical Appointment: Booking Process, Errors & Solutions

Wafid Medical Appointment
Introduction: Why Wafid Medical Appointments Are a Major Pain Point
Every year, millions of professionals apply for work visas to GCC countries such as Saudi Arabia, the UAE, Kuwait, Qatar, Oman, and Bahrain.
One mandatory step in this process is the Wafid Medical Appointment, earlier known as GAMCA.
On paper, the process looks simple.
In reality, many applicants face failed payments, booking errors, wrong passport details, or missing slips.
For working professionals, these issues create stress, delays, and sometimes job offer risks.
This guide solves that problem.
It explains:
- How the Wafid Medical Appointment system works
- The exact booking process
- The most common errors users face
- Practical solutions that actually work
What Is a Wafid Medical Appointment and Why Does It Matter
A Wafid Medical Appointment is an online booking system for GCC visa medical tests.
It is mandatory for employment visas.
Why this appointment is critical
- No medical means no visa processing
- GCC embassies only accept Wafid-approved medical reports
- Incorrect booking can lead to rejection or delays
Who needs it
- Engineers
- IT professionals
- Healthcare workers
- Skilled and semi-skilled workers moving to GCC countries
How the Wafid Medical Booking System Works
The Wafid platform connects three entities:
- The visa applicant
- Approved medical centres
- GCC country authorities
System flow
- Applicant enters passport and visa details
- The system assigns an approved medical centre
- Medical tests are conducted
- Results are uploaded digitally
- Status is shared with the embassy
Step-by-Step Wafid Medical Appointment Booking Process
This is the safest and most error-free way to book.
Step 1: Collect required details
- Passport number
- Passport issue and expiry date
- Nationality
- Destination GCC country
- Visa type
Double-check all fields before moving ahead.
Step 2: Register on the Wafid portal
- Enter passport details exactly as printed
- Avoid using auto-fill tools
- Use a stable internet connection
Step 3: Select the country and the city
The system auto-assigns a medical centre based on availability.
You cannot manually choose clinics in most cases.
Step 4: Pay the medical fee
- Use international cards if possible
- Avoid peak hours
- Do not refresh during payment
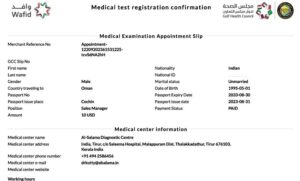
Step 5: Download appointment slip
This slip is mandatory at the medical centre.
Save multiple copies.
Common Wafid Medical Appointment Errors Professionals Face
This section addresses the real problems users search for online.
Error 1: Payment Failed, but Amount Debited
This happens due to:
- Network timeouts
- Bank verification delays
Error 2: Appointment Slip Not Generated
Causes include:
- Browser compatibility issues
- Session timeout
- Incomplete registration
Error 3: Passport Details Mismatch
Even a single character mismatch leads to rejection.
Error 4: Medical Centre Not Assigned
Usually occurs during high traffic periods.
Error 5: Server Error or Page Not Loading
Often seen during weekends and peak visa seasons.
Proven Solutions to Fix Wafid Booking Errors
These solutions are based on real user cases.
Solution for Payment Issues
- Wait 24 to 48 hours before retrying
- Check the bank statement reference number
- Avoid multiple payment attempts
Solution for Slip Not Generating
- Log in after a few hours
- Use a different browser
- Clear cache and cookies
Solution for Passport Errors
- Do not create a new profile immediately
- Contact Wafid support through official channels
- Carry the corrected proof to the medical centre if advised
Solution for Server Errors
- Book during non-peak hours
- Early morning US time works best
- Avoid mobile browsers
Documents Required at the Medical Centre
Carry all documents in original form.
Mandatory documents
- Printed Wafid appointment slip
- Original passport
- Passport-size photographs
- Visa copy if available
What Happens During the Medical Test
The test usually includes:
- Blood tests
- Chest X-ray
- Physical examination
- Vision check
The entire process typically takes 2 to 3 hours.
Understanding Medical Results and Status Updates
Common status terms
- Fit: Eligible for visa processing
- Unfit: Medical conditions detected
- Under process: Reports pending review
Most results are updated within 3 to 5 working days.
Professionals should avoid repeated status checks in short intervals.
Why Following the Correct Process Saves Time and Career Risk
For working professionals, delays mean:
- Missed onboarding dates
- Visa resubmission
- Employer dissatisfaction
A correct Wafid appointment process:
- Reduces stress
- Prevents financial loss
- Ensures compliance with GCC rules
This is not just a medical step.
It is a career-critical checkpoint.
Final Checklist Before Booking Your Appointment
Use this list before clicking submit.
- Passport details verified twice
- Correct GCC country selected
- Stable internet connection
- Payment method ready
- Browser compatibility checked
Conclusion: A Systematic Approach Works Best
The Wafid Medical Appointment system is strict but predictable.
Most issues happen due to small mistakes.
For professionals planning international careers, understanding the system is essential.
Follow the steps.
Avoid shortcuts.
Use the solutions shared above.
A smooth medical appointment keeps your visa process on track and your career plans intact.